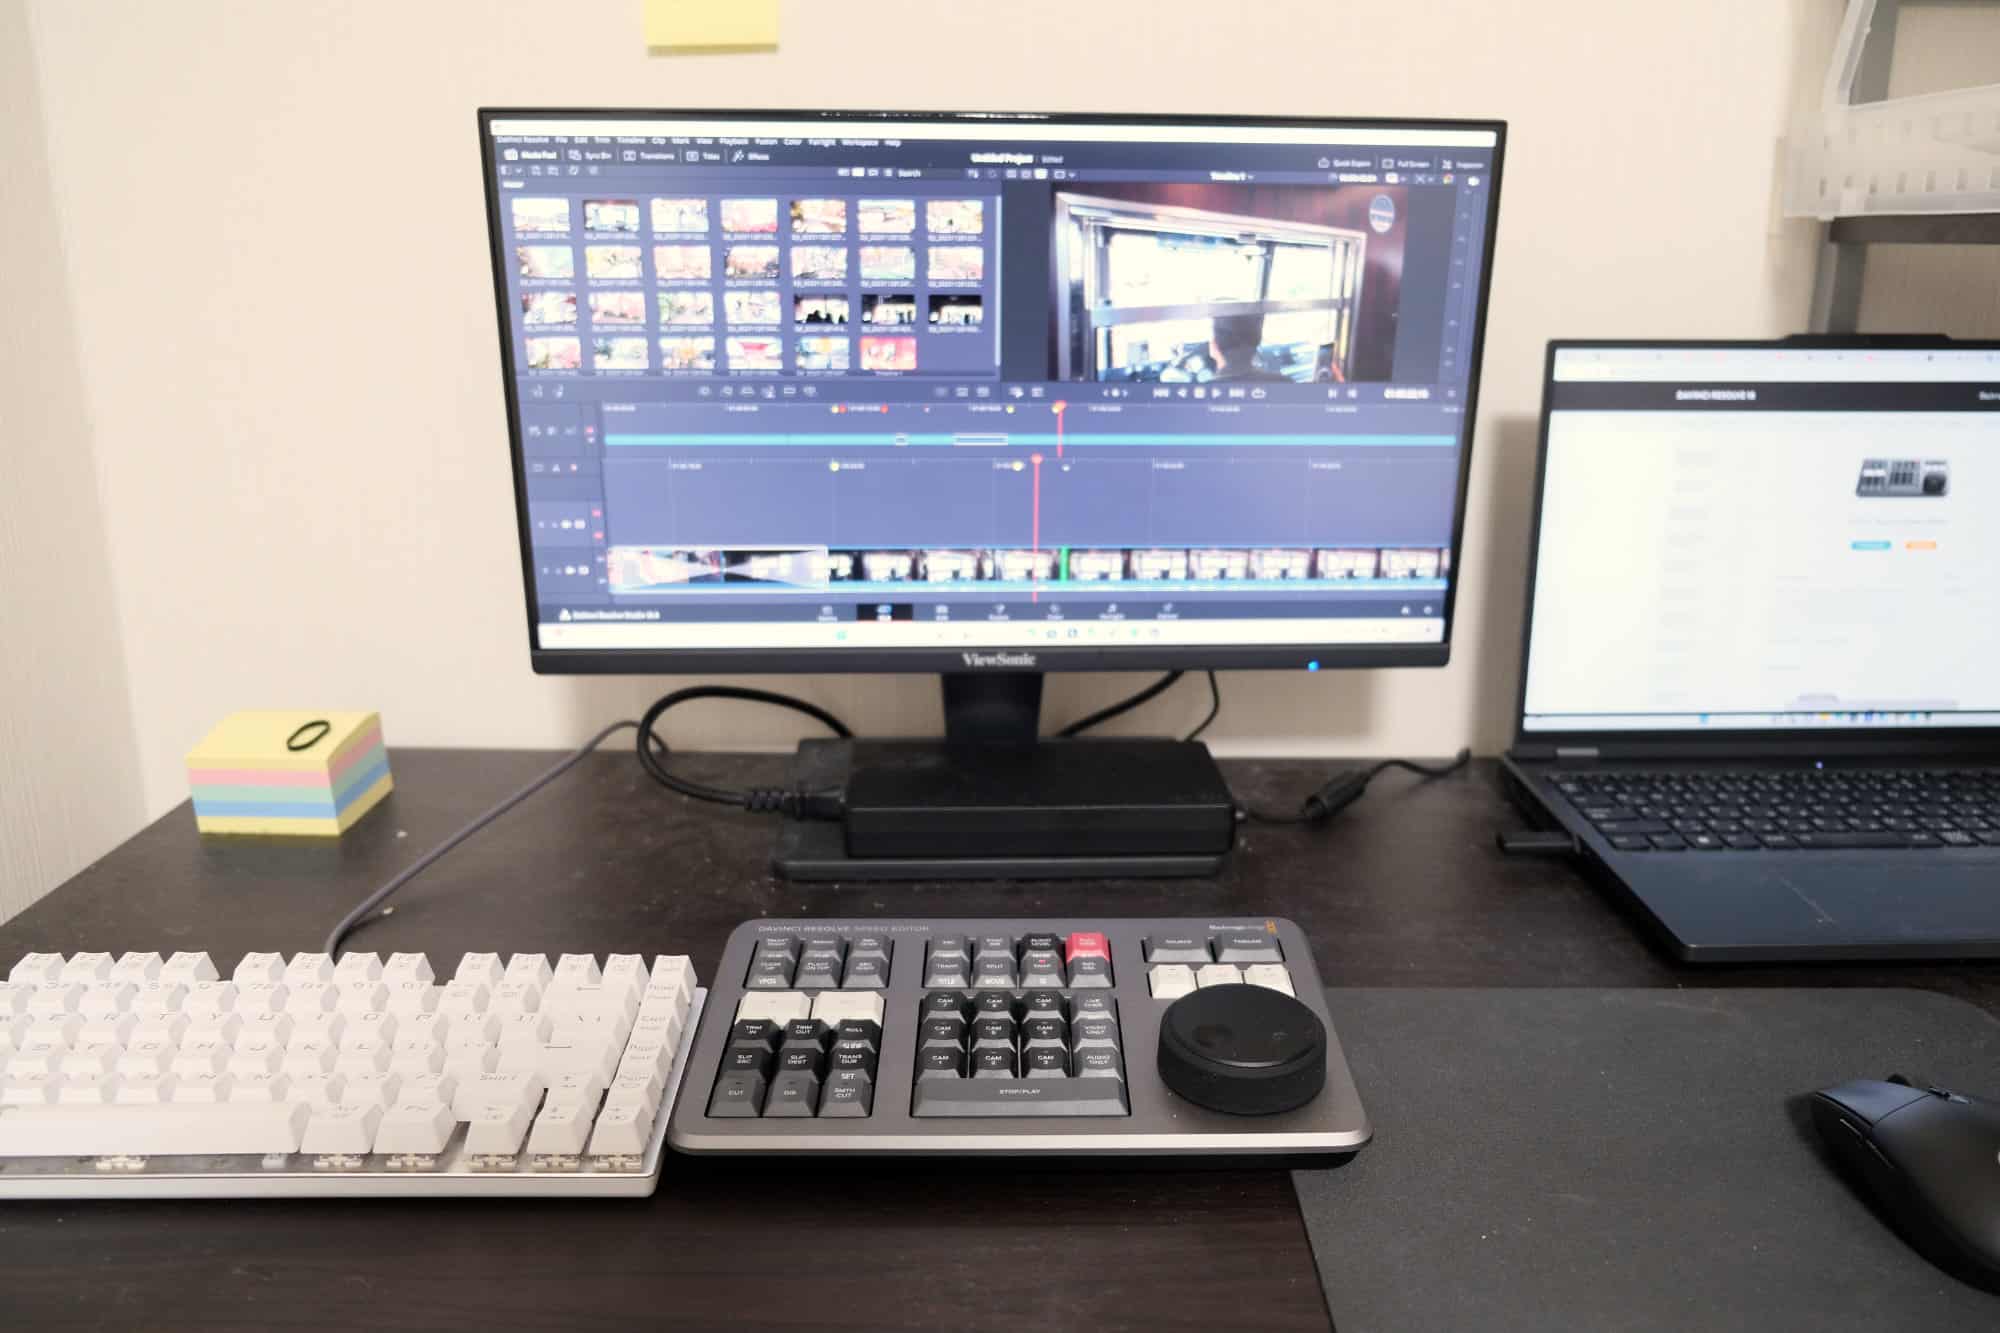
The Blackmagic Design DaVinci Resolve Speed Editor is a tool I use in my daily video editing workflow. But I also know many people who let it gather dust in the corner because it doesn’t fit into their workflow. That’s fine, but I do believe it is at least worth trying to adapt and see if it can work with you, as opposed to slowing you down.
So in this guide, I’m going to dive into the fundamentals of using the Speed Editor. The Speed Editor is designed to make your editing faster, more intuitive, and more enjoyable, but only if you’re familiar with its ins and outs.
It’s important to note that while the Speed Editor has a range of capabilities, in this guide, I’m going to stick to the basics. I won’t be delving into more advanced features like multicam editing and sync bins. These are powerful tools in their own right, but for those just starting out, it’s essential to build a solid foundation first.
So, whether you’re new to video editing or looking to enhance your existing skills, the Speed Editor offers a unique and efficient way to navigate and edit your projects. Let’s get started on this journey to unlock the full potential of your editing workflow with the Davinci Speed Editor!
Table of Contents
Connecting Your Davinci Speed Editor
Before talking about how to use it in DaVinci Resolve, it’s essential to properly set it up and connect it to your computer.
The Speed Editor offers two primary modes of connection: USB-C and Bluetooth. Keep in mind that if your computer doesn’t have a USB-C port, you’ll either need a Type-C to Type-A adapter, or a separate USB-C to USB-A cable.
Cable connection is simplest, but I prefer to pair it to my computer using Bluetooth. That’s one less cable to deal with, hooray!
The slightly confusing part when using wireless mode is that there is no dedicated power button. Instead, randomly mashing a few keys will bring it to life and then it’s ready to pair, or will automatically pair if it’s been paired before.
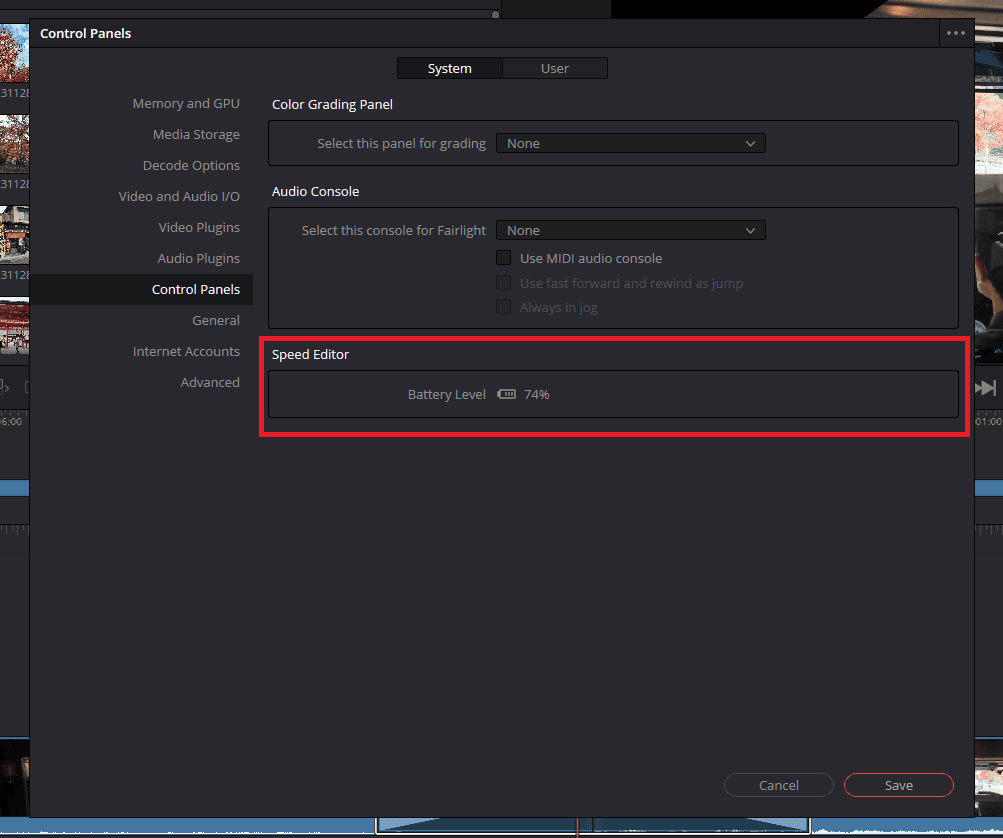
The Speed Editor doesn’t have a battery indicator on itself, so you need to go to Preferences->Control Panels in order to check the remaining battery level.
Before You Start
Before I dive into the various keys and their functions, there are a few things that you should know beforehand in order to avoid confusion later on.
Start Using The Cut Page!
If you’re going to use the Speed Editor, you need to embrace the Cut page in Davinci resolve wholeheartedly. Many people prefer to do everything from the Edit page, which is fine, but if you want to use the Speed Editor, you really ought to get used to it. After all, the Speed Editor was designed with the Cut page in mind.
The Cut page, distinct from other pages like Edit, Color, or Deliver, is specifically designed for fast, efficient editing. It’s streamlined, uncluttered, and focuses on the essential tools you need for quick assembly and trimming of your footage. As someone who often starts projects with hundreds of unorganized clips from my phone, camera, DJI Pocket 3, Insta360 Go 3, it’s a massive timesaver.

Now, this isn’t to say that the Speed Editor isn’t useful on other pages – it certainly can be. But as a beginner, familiarizing yourself with its operation on the Cut page is a critical first step. Once you’re comfortable here, you’ll find it much easier to expand your knowledge of how the Speed Editor works on other pages.
The Search Dial Is The Best Part
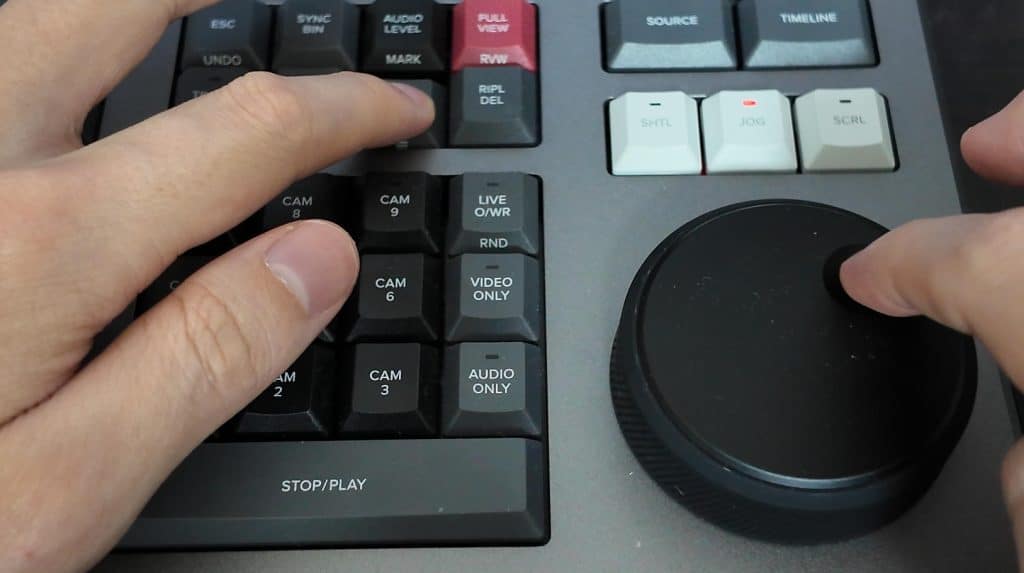
Besides the satisfying Cherry MX Red keys, the Davinci Speed Editor experience is undoubtedly defined by the machined metal search dial. Coming from a keyboard, this will completely change how you navigate through your timeline and footage. Whether it’s actually faster or not is debatable, but it sure as hell is a lot more fun.
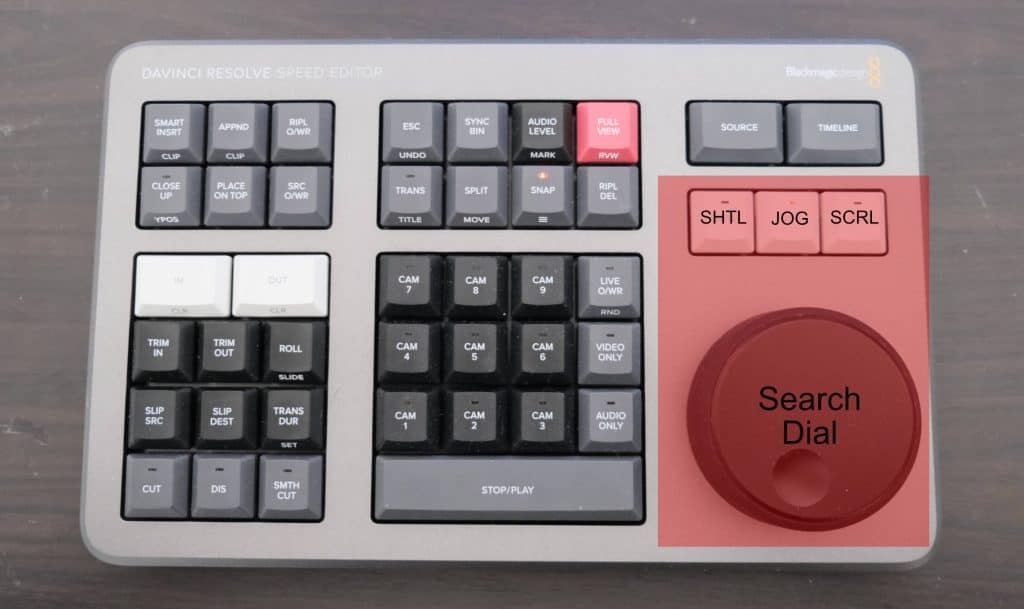
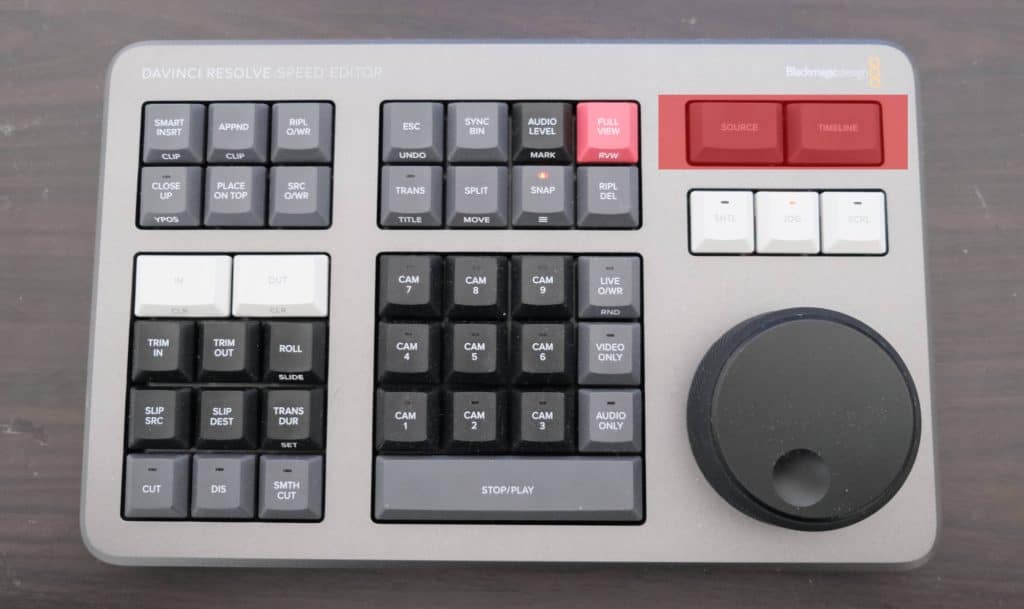
The dial has three modes when moving through footage. These are toggled by the three buttons above the dial: JOG, SHTL (Shuttle), and SCRL (Scroll), each offering a unique way to interact with your project.
JOG (Jog): This is where I spend most of my time. The JOG function allows you to move through your timeline or footage with impressive precision. It’s incredibly intuitive – a gentle turn moves you slowly, frame by frame, which is perfect for fine-tuning edits or finding that exact moment in your footage.
SHTL (Shuttle): The SHTL mode is an interesting take on the traditional JKL scrubbing method. By turning the dial, the playhead shuttles through the footage, with the speed increasing the more you turn. While it’s a novel approach, I’ve found it lacks the precision needed for certain tasks. It’s a feature that some may find useful, but personally, I prefer the precision and familiarity of traditional JKL scrubbing on my keyboard.
SCRL (Scroll): Alongside JOG, SCRL is a mode I frequently use. It’s designed for when you need to move quickly through your timeline. A swift turn of the dial in SCRL mode sends the playhead zipping across your project, making it ideal for jumping to different sections or getting a quick overview of your entire edit. It’s a great way to complement the precision of JOG with the ability to navigate larger portions of your timeline efficiently.
In summary, the Search Dial is a central feature of the Speed Editor, with the JOG and SCRL functions being integral to my editing process.
Get Familiar with the Smart Indicator
One of the features of the Davinci Resolve Cut page, which becomes even more powerful when using the Speed Editor, is the Smart Indicator. You need to be familiar with it as the Speed Editor’s are heavily tied to it.
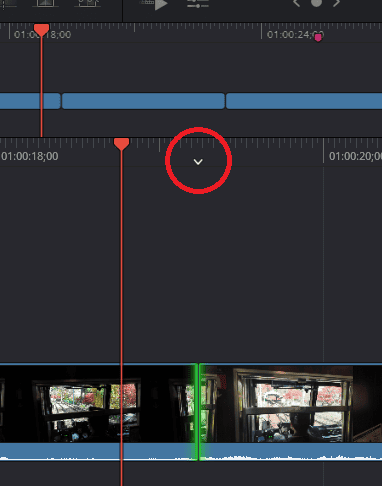
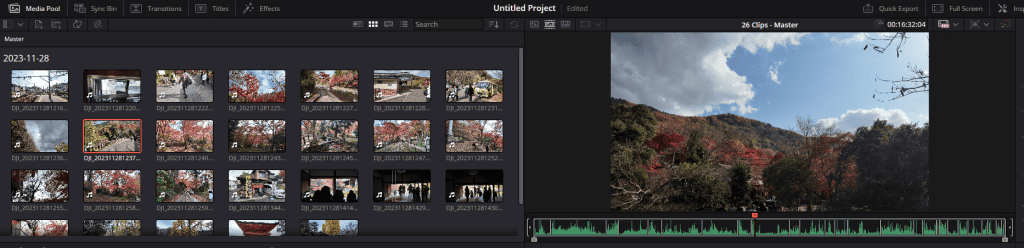
The Smart Indicator is represented by a small, white, animated arrow located on the timeline ruler of the Cut page. Its primary function is to indicate where your edit operations will take place.
For example, let’s say your playhead is towards the end of a clip in the timeline, but not exactly at the end (like in the image). The Smart Indicator will then be at the end of this clip, because you’re closer to the end than the beginning. Inserting a new clip with the Speed Editor’s Smart Insert button will place it after this clip, while using the “Trim in” button will trim the beginning of the following video as opposed to the clip your playhead is on.
However, it’s important to note that the Smart Indicator has its quirks. It’s not infallible and sometimes may be the cause of the headache it’s trying to solve.
Some Buttons Have Multiple Uses
One important aspect of the Davinci Speed Edito is the multifunctionality of many of its buttons. Many of the buttons on this compact device serve dual purposes, depending on how you interact with them. This design choice not only saves space but also adds a layer of efficiency to your editing workflow.
In general, a single tap on a button will perform the primary function, which is clearly labeled on the face of the key.
To access a button’s secondary function, you’ll often either double-tap it or hold it down while rotating the search dial. This secondary function is usually indicated on the lower side of the key, providing a handy reference as you get used to the layout.
For example, the most used is the double-tap functionality of the ESC key, which acts as an UNDO command. This is incredibly useful in fast-paced editing scenarios where you might make frequent adjustments and need to quickly revert a change.
Another great example is the SNAP button. By double-pressing and holding down the SNAP button and then rotating the search dial, you can adjust the viewer size. This is a fantastic feature for fine-tuning your view without needing to reach for your mouse.
Timeline View and Source Tape
Understanding the distinction between the Timeline and Source Tape functionalities on the Davinci Speed Editor is crucial for efficient editing.
These features, accessible via the TIMELINE and SOURCE buttons, respectively, offer different perspectives and tools for handling your footage.
TIMELINE Button: When you press the TIMELINE button, the Speed Editor’s focus shifts directly to the timeline of your project. This means that all your edits, cuts, and navigations are now affecting the timeline itself. It’s a straightforward way to interact with your project, allowing you to make precise edits and adjustments to the clips already placed on your timeline. This mode is where you’ll likely spend a significant portion of your editing time, especially when fine-tuning your project.
SOURCE Button and Source Tape: On the other hand, the SOURCE button introduces you to the concept of the Source Tape. This is not to be confused with a single source clip. Instead, the Source Tape compiles all your clips into one long, continuous video stream. This feature is incredibly useful for quickly browsing through all your footage without the need to individually click and preview each clip.
If you’re used to working with individual source clips, it might feel strange making the switch to working on one big source tape instead. I don’t necessarily think it’s better or worse, but if you have tons of clips in the Media Pool and don’t want to keep going back to your mouse to select them, this is a nice alternative.
PRO TIP: if you’ve marked an IN and an OUT point while in Source Tape mode, pressing the SOURCE button again zooms in on that specific section, allowing for more intricate refinement. And if you want to return to viewing the entire Source Tape, a simple tap on the ESC button will do the trick.
Marking IN and OUT points on clips
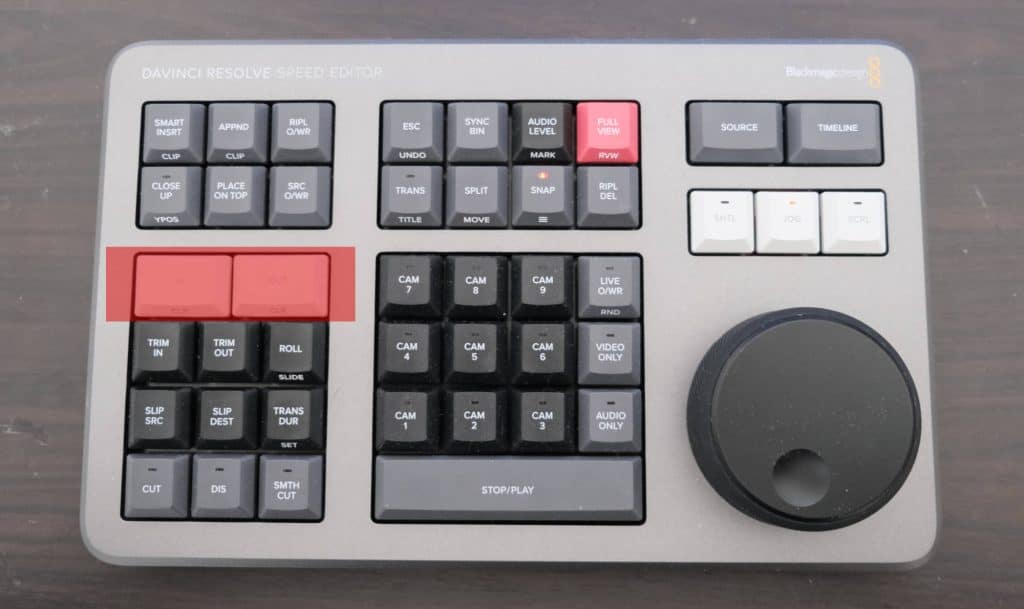
A fundamental aspect of editing with the Davinci Speed Editor involves the use of IN and OUT points, which are essential for defining the specific segments of your clips that you want to include before inserting them into your timeline. The Speed Editor makes this process incredibly straightforward.
To mark an IN point, simply navigate to the desired start point of your clip in the viewer and press the IN button. Similarly, for marking an OUT point, move to where you want the segment to end and press the OUT button. This process can be done either while working with a source clip or while using the Source Tape, allowing you to precisely select the portions of footage you wish to work with.
When I’m working with the Source Tape, I will typically mark in and out points and then insert them into the timeline. I’ll then unset them and create new and different IN and OUT points to insert into the timeline. Rinse and repeat.
If you want to unset your current IN and OUT points, double tapping the IN and OUT button respectively will clear them.
Insert Operations
The Davinci Speed Editor simplifies and enhances various insert operations, making it easier to assemble your timeline. Here’s a breakdown of the Speed Editor’s insert functions and how they can be utilized effectively:
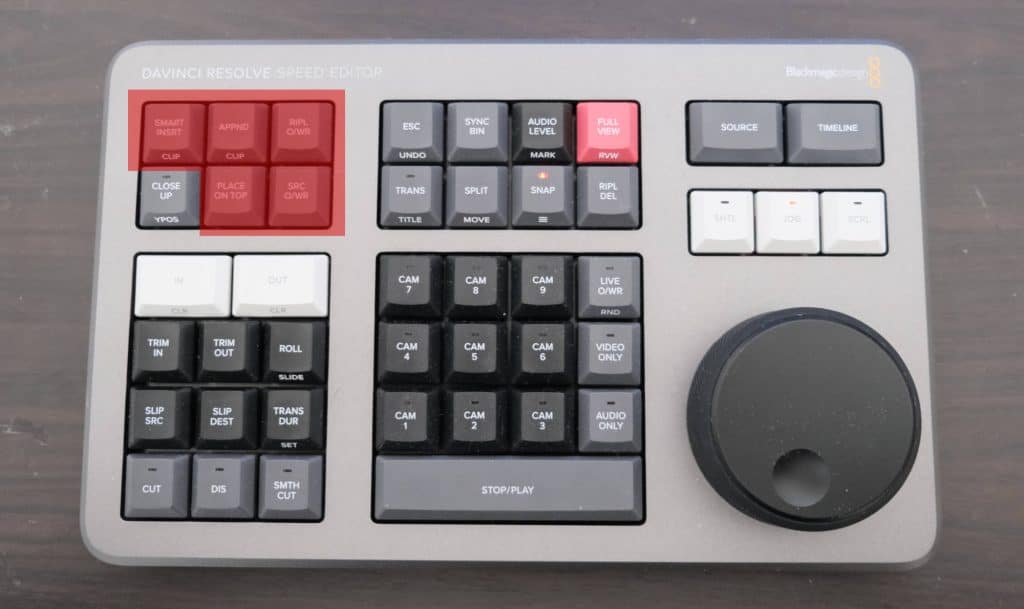
Smart Insert: Inserts a clip at the edit point located nearest the playhead and pushes everything else down the timeline to make room for it.
Append: Adds clip to the end of your timeline. This is particularly useful when building your story from scratch, as it allows you to sequentially add clips in the order you want them to appear.
Ripple Overwrite (Ripple O/WR): Ripple Overwrite is a sophisticated feature that replaces a clip in the timeline with a new one while automatically adjusting the timeline’s length. This means if the new clip is shorter or longer than the old one, the timeline will ripple forward or backward to accommodate the change, keeping everything in sync.
Place on Top: This function allows you to overlay a clip onto your existing timeline, creating a new track above the current one. It’s particularly useful for adding cutaways, B-roll, or overlay graphics without disturbing the underlying primary footage.
Source Overwrite (SRC O/WR): Source overwrite places the source clip as marked, on top of anywhere in the timeline that matching timecode exists. It’s a slightly more advanced feature, so we won’t discuss it further.
Timeline Editing Operations
The Davinci Speed Editor offers a suite of powerful timeline edit operations that are essential for refining your edit.
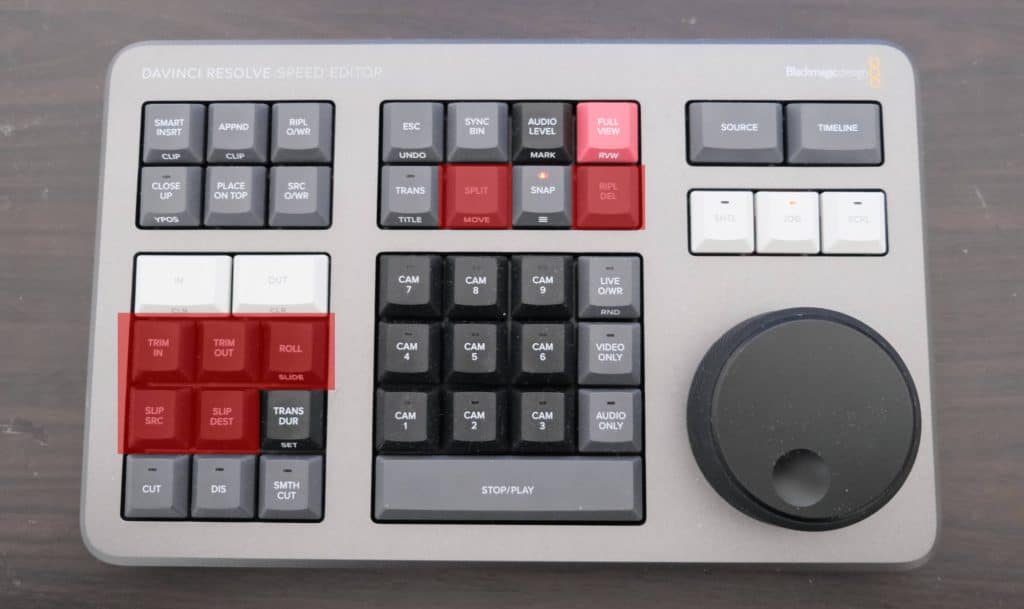
The SPLIT and TRIM IN/OUT are by far the timeline edit operations I use the most:
SPLIT Button: The SPLIT function is crucial for segmenting your clips. By pressing the SPLIT button, you can cut a clip at the playhead’s current position. This is the same as using the razor blade on the Edit page.
Trim IN and Trim OUT Buttons: These buttons trim in or out as you might expect. Just keep in mind where your smart indicator is as you might otherwise accidentally trim the wrong clip.
Now, the edit operations that follow are a bit more situational, but still frequently used. It might be difficult to understand exactly what they achieve from reading the explanations, so I’d suggest experimenting with them in DaVinci Resolve yourself to get a better feel for them.
Roll: The Roll function is used for adjusting the point where two clips meet, known as the edit point. By pressing the Roll button, you can move this edit point back and forth, effectively extending one clip while shortening the adjacent one, without changing the overall timeline duration. This is great for refining the pacing of your edit.
Slide (Double Tap Roll Button): By double-tapping the Roll button, you activate the Slide function. This allows you to move a clip along the timeline while keeping its in and out points fixed. The adjacent clips will adjust to accommodate the move, making it a handy tool for repositioning clips without altering their duration.
Slip SRC and Slip DEST: The Slip SRC (Source) and Slip DEST (Destination) buttons enable you to adjust the in and out points of a clip simultaneously while keeping its duration and position on the timeline constant. This is particularly useful for changing the content of a clip without affecting its timing in relation to the rest of your timeline.
Ripple Delete: Ripple Delete is an efficient way to remove a clip from your timeline while automatically closing the gap left behind. This ensures that your edit remains seamless and that the overall timing of your project is preserved.
MOVE (hold down SPLIT/MOVE Button and rotate search dial): This operation allows you to reorder clips in your timeline. By holding down the SPLIT button and rotating the search wheel, you can move the selected clip to a different position within the timeline. It’s a quick and intuitive way to rearrange your story’s flow.
Important: Make Sure “Ripple On” is Active!
A crucial tip for anyone using the Davinci Speed Editor, especially those new to it, is to ensure that the “Ripple” function is active while working on the Cut page. This might seem like a small detail, but it has a significant impact on how your timeline operations behave.
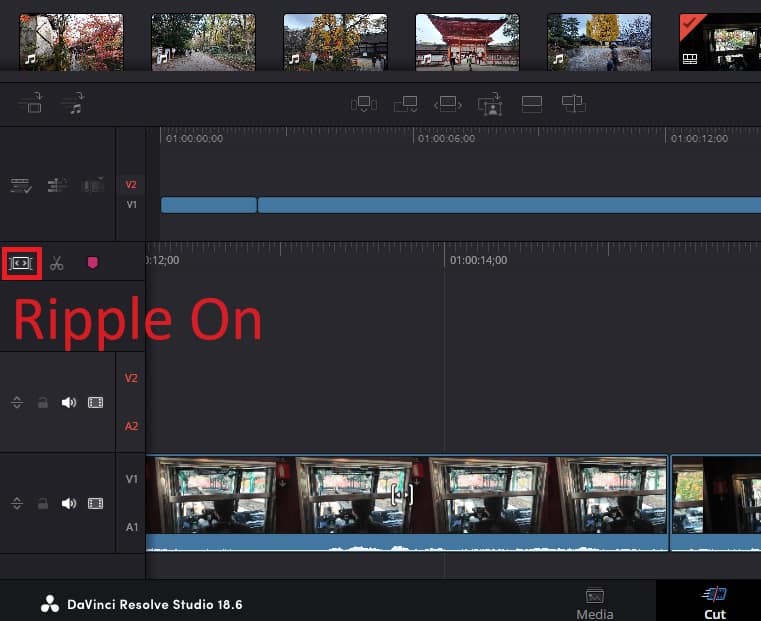
By default, the Cut page in Davinci Resolve has the Ripple mode turned on. This mode ensures that when you perform actions like trimming or ripple deleting, the rest of the timeline adjusts accordingly to fill in gaps or maintain synchronization. It’s a feature that maintains the flow and timing of your edit, especially when removing or rearranging clips.
However, it’s possible to inadvertently turn off the Ripple mode. When Ripple is off, actions like trimming or deleting clips won’t affect the rest of the timeline. This can lead to gaps in your edit or unsynchronized clips, which can be confusing and frustrating, especially if you’re not aware of the change.
I experienced some initial confusion when I first started using the Speed Editor, as I accidentally turned it off and didn’t know why things were behaving differently.. It’s not always easy to tell at a glance whether Ripple is on or off, so it’s a good practice to double check this setting.
Transition Effect Operations
Transitions are a vital part of video editing, adding polish and flow to your project. The Davinci Speed Editor simplifies the process of adding and managing transitions with dedicated buttons, each serving a specific function:
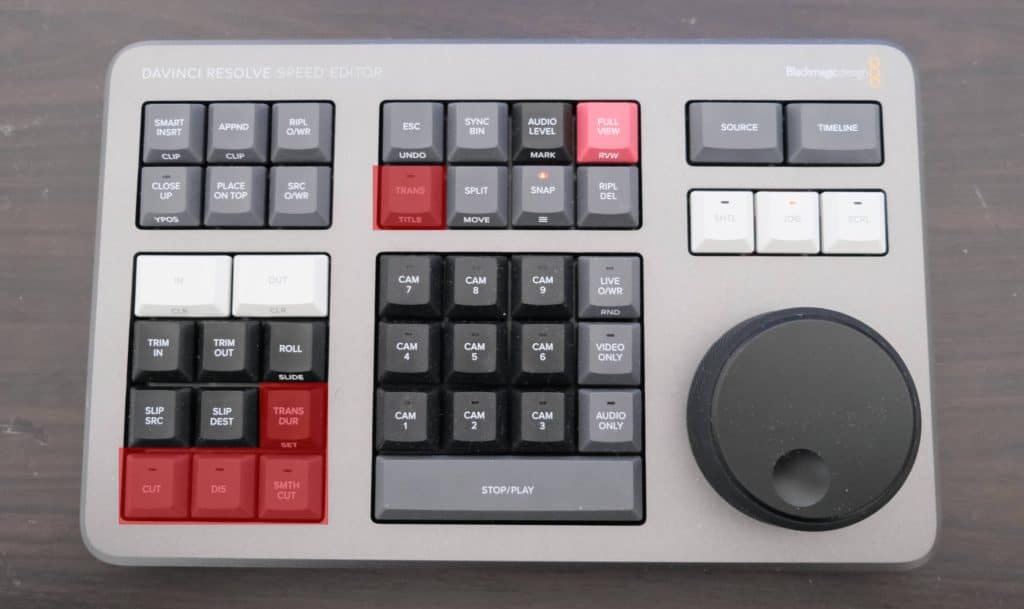
TRANS Button: This is your go-to button for adding transitions between clips. Simply position your playhead where you want the transition, and press the TRANS button to add a standard transition (usually a cross dissolve by default). If you want to explore different transition types, hold down the TRANS button and use the search dial to scroll through the available options. This feature makes it easy to experiment with various transitions to see which best suits your project.
CUT Key: When you’re not in multicam mode, pressing the CUT key will remove any transition at the playhead. This is particularly useful for quickly undoing a transition or for switching back to a simple cut without navigating through menus.
DIS Button: Pressing the DIS (Dissolve) button adds a dissolve transition at the playhead. Dissolves are one of the most commonly used transitions, as they offer a smooth way to blend from one clip to another. It’s a great tool for creating a sense of continuity or for softening the transition between scenes.
SMTH CUT Button: The SMTH CUT (Smooth Cut) feature is a bit more specialized but can be incredibly useful. It’s designed to make jump cuts less noticeable by blending the end of one clip with the beginning of the next. While it might not be something I use very often, it’s a valuable tool for making quick cuts without disruption. A common use for it is when editing out the umms and errs in interviews.
TRANS DUR Button: Adjusting the duration of a transition is crucial for getting the right feel and timing. By holding down the TRANS DUR button and using the search dial, you can fine-tune the length of your transition. This level of control allows you to match the transition duration to the rhythm and pace of your project.
SET transition (double tap TRANS DUR/SET button): This sets the current transition as the default.
Other Noteworthy Functions
These miscellaneous functions didn’t really belong in the above categories, but they’re still very useful:
Mark Function: Creating markers on your timeline is essential for noting important points, making annotations, or simply keeping your edit organized. With the Speed Editor, you can quickly add a marker by double-pressing the “Audio Level/Mark” button. This places a marker at the playhead’s current position. Moreover, if you want to customize the color of your marker for better organization or visual cues, simply hold down the “Audio Level” button and spin the search dial to cycle through different colors.
Close Up: This function is a real time-saver for creating cut-ins or emphasizing details. By pressing the “Close Up” button, the Speed Editor automatically creates another video track with a zoomed-in (2x punch in) version of your current clip. This new track can then be trimmed and customized as needed. If you need to adjust the framing, hold down the same “Close Up/YPOS” button and rotate the search dial to move the Y position of the video, allowing you to shift the framing up or down to get the perfect shot.
Audio Level: Adjusting audio levels is a crucial part of the editing process, and the Speed Editor makes this task effortless. By holding down the “Audio Level” button and rotating the search dial, you can adjust the volume of the selected clip. This feature provides a quick and intuitive way to ensure your audio levels are consistent and appropriate for your project.
Title: Double click the TRANS/TITLE button and scroll the search dial to scroll through and change the font of your title.
Conclusion
And there you have it – a comprehensive walkthrough of the core functions and capabilities of the Davinci Speed Editor!
I’ve only scratched the surface of all this speedy keyboard has to offer. As you get more comfortable leveraging these fundamental features, consider diving deeper into advanced functionalities like multicam editing and sync bins to further boost efficiency.
If you have any questions or have something to add, please leave a comment below!
The Speed Editor never worked with my desktop for the last 18 months. Could not get it to pair. It would just keep saying connecting, drop off the list of devices, reappear, try to connect again and fall of the list again. This would repeat continuously.
I only found out this week that the Bluetooth adapter HAS to support LE (low energy) mode. The intel 5.2 bluetooth on my motherboard did not support this feature. I bought a ten dollar usb blue tooth adapter with 5.4 BT that supported LE mode. Turned off my BT in Device Manger, plugged in the usb adapter and after the drivers were automatically installed in windows 10, my SE keyboard paired with the computer easily and now works flawless ly in BT mode.
Thanks Max for the useful “DaVinci Resolve Speed Editor
for Dummies” to expand the knowledge about this piece of hardware.
Kind regards.
Thank you! Very useful 🙂
I’ve been staring at the Speed Editor on my desk for a couple of months, and wondered where to start. Tried a few obvious things, but this tutorial expands my knowledge perfectly as I find the best uses of the SE. I suspect it will be in constant use. Thanks.
Awesome, I’m glad you found it helpful!
Thank you!