Many of us have a bunch of videos on our computers that we’d love to put on our iPhones.
Unfortunately, the process of transferring media between the two isn’t always as straightforward as you would hope.
Unlike Android, the iPhone doesn’t let you simply connect to your computer’s USB port and drag and drop files into its storage. So, how should you put videos that you recorded or downloaded onto your iPhone for offline viewing?
There are four ways of going about this:
- Using AirDrop (Mac only)
- Using iTunes (PC)
- Using third party software (PC/Mac)
- Using the cloud
Method 1: Using AirDrop (Mac only)
If you’re a Mac user, AirDrop is by far the simplest and most convenient method of putting videos onto your iPhone. While there are other ways to transfer videos over to your phone, this is the most standard method people use.
It might feel unintuitive if you’re used to transferring files via cable, but once you get used to it there’s no going back.
Speed is actually faster than transferring via USB cable, because cable data transfers on iPhones (with the exception of the iPhone 15 Pro and Pro Max) are limited to USB2 speeds. Just make sure both devices are on the same WiFi network, AirDrop will otherwise fallback to noticeably slower Bluetooth.
Here is how you do it:
- On your Mac, open your Finder.
- On the left sidebar, locate Airdrop. Alternatively, Choose Go > AirDrop from the menu bar in the Finder.
- Turn on bluetooth if it isn’t already on.
- You should see your iPhone device as one of the nearby devices. Make sure your iPhone has Bluetooth and WiFi turned on.
- Drag and drop your video(s) to your iPhone device. Voila.
Note: Airdropped files are automatically handled by an app on your iPhone that can open the file. If your video has a format that can’t be handled by any of your iPhone apps, you can’t transfer the video. I therefore recommend downloading VLC for Mobile on your iPhone which can basically play any type of video you throw at it.
Method 2: Using iTunes (PC)
If you’ve ever connected your iPhone directly to your PC, you might know that you can explore and download photos and videos to your PC. However, it only works one way, you can’t drag and drop files from your PC onto your iPhone.
Using iTunes is Apple’s “recommended” method for transferring music, photos, and videos to your iPhone.
Unfortunately, the experience is rather poor, and it almost feels like Apple have deliberately made it that way to draw you into their own ecosystem.
Nevertheless, here is how you can use iTunes on PC to transfer videos to your iPhone.
- Connect your iPhone to your computer using a Lightning-to-USB cable (or USB-C cable if using a iPhone 15 or newer)
- Launch iTunes on your computer
- Navigate to File > Add to Library or File > Add Folder to Library
- Locate the video you want (or folder of videos) and then click Open. Your video(s) are now part of your iTunes library.
- Click on iPhone > Movies.
- Tick the Sync Movies checkbox
- Select the video(s) you just imported to your iTunes library and press Apply/Sync. Your video(s) are now on your iPhone.
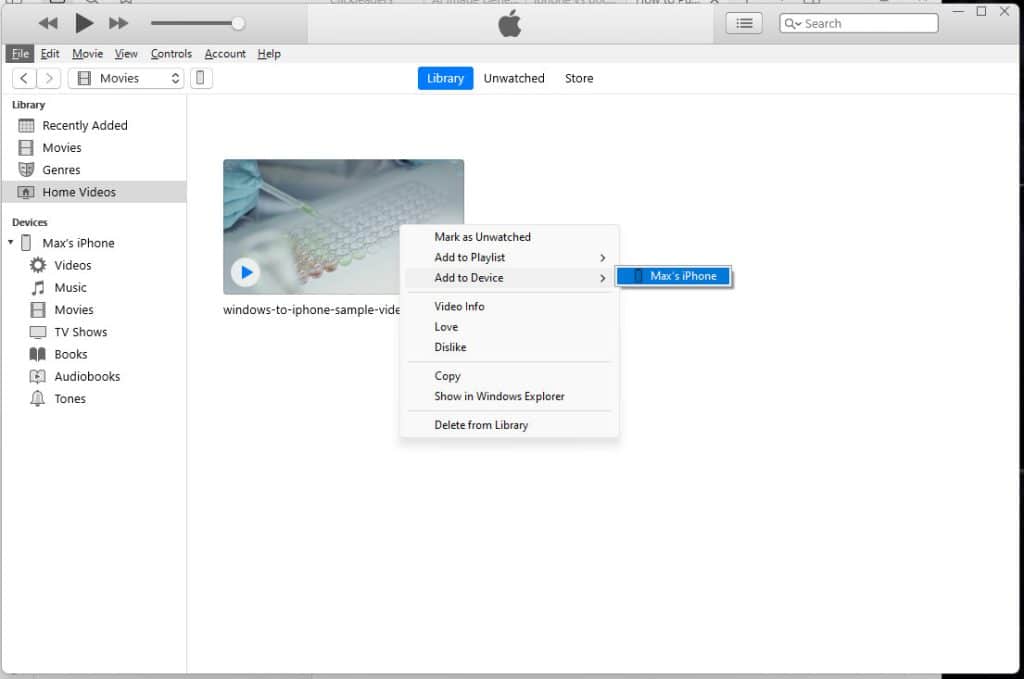
Alternatively, once the video is in your iTunes library, you can also right click it and add the single video to your iPhone without going through the whole syncing process:
Note that any videos you export to your iPhone using iTunes will be available in the Apple TV app. You won’t find them in the Photos app.
Why I’m not a fan of the iTunes method
Apple designed iTunes with the intention that it would be your all in one media library across all your devices (computer, iPhone, iPad etc.) While this has some advantages, it also comes with its own set of problems:
- Forces you to import videos to your iTunes library first, only then can you transfer it over to your iPhone. It’s a two step process.
- iTunes on Windows isn’t good and there are much better media library alternatives out there
- Many video formats are unsupported by iTunes.
- Potential syncing issues (e.g. deleting media on one device effects other devices)
As a result, I personally don’t use iTunes to put videos on my iPhone.

Method 3: Using A Third Party App (PC and Mac)
For PC (Windows) users, using a third party iPhone file transfer app is by far the simplest and fastest method. This is also a good option for Mac users – although Airdrop is best for most transfers.
There are numerous iPhone file transfer software solutions out there but my personal recommendation is WALTR Pro. Compared to the other programs I’ve used in the past, it’s dead easy. You literally drag and drop video files (or any type of file, for that matter) onto your iPhone like this:
As you can see, using a third party app like WALTR Pro is far more intuitive than using iTunes. Here are the steps to take once you’ve installed the app on your computer:
- Launch WALTR Pro
- Connect your iPhone to your computer via USB (wireless transfer over Wi-Fi is also supported)
- Locate and drag the file you want to transfer to the iPhone, or press ‘Select Files…’ and pick your file from Windows Explorer or Mac Finder.
- Wait for WALTR Pro to do its thing and upload the file to your phone.
Like iTunes, videos are by default made available to the Apple TV app. However, you can also change where the video goes. I import files into the Files by WALTR companion app, and from there I can save it anywhere else if I want to.
And the cool thing about this application is that it does a lot of things behind the scenes. If the video is in an unsupported file format, it converts it on-the-fly before sending it to your iPhone. It also automatically adds artwork and metadata like genre and episode descriptions to keep things organized.
If you want a free solution, EaseUS MobiMover is a good alternative. However, it lacks the smart conversion feature and its interface is nowhere near as slick or intuitive.
Method 4: Via The Cloud
The last method is to use a Cloud service. The most popular Cloud services are Apple iCloud, Google Drive, Microsoft OneCloud and Dropbox.
This method offers a fairly straightforward approach for transferring videos to your iPhone, albeit with slow upload speeds, particularly for larger files.
While direct transfer techniques (without the use of cloud hosting as an intermediary) are more efficient for simple transfers, opting for this method is advantageous if cloud backup is desired.
Regardless of which cloud service you choose, the process is the same:
- On your PC/Mac, upload the video to the cloud by downloading the cloud provider’s client. This may take a while.
- On your iPhone, use the corresponding Cloud app to download the video you just uploaded.
I personally use Google Drive because it works well across all platforms and I use many Google services like Google Photos already. The iPhone app for Google Drive can be downloaded here.
Apple iCloud works well but I wouldn’t suggest it if you’re like me and use non-Apple devices as well.